
“There are no knee openers in yoga.”
This wise saying helps protect our knees when we are working to open our hips: if the hips are very tight, the stress of postures, such as Pigeon or Cow Face pose, will often go right into the knee and could tear the meniscus. There is another wise saying, “No pain, no pain.” The philosophy here is quite clear. Minimise any twist in the knees, especially as the knee straightens, and if you experience any pain at all, back off.
But this doesn’t mean that you can’t work the knees in ways that can help them heal or make them stronger. There are ways to do so, and we will explore a very successful technique involving Yin Yoga principles and some simple props.
If you suffer from pain in the knees due to meniscus damage, knee cap issues, gout or arthritis, this practice may help you. However, as always, if you have significant issues, please check first with your healthcare provider before doing this exercise. [It may not be a good idea, for example, if you have cruciate ligament damage.]
The technique shown here – a variation of Virasana or Hero’s pose – has been pioneered in the Iyengar community for many years. It applies the Yin Yoga principles of long-held stress, held in stillness, and with no pain. I can offer a personal testimonial to its effectiveness, but I will defer that to the end of this article.
You will need a few props:
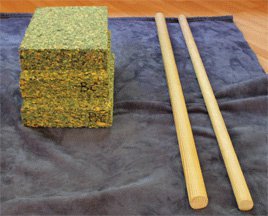
- Three cushions (or books about two inches thick)
- Some wooden doweling (start with a smaller diameter dowel first, say 1 inch and work your way up over time to 1.5 inches) or a rolled up towel. Another option, in place of the dowel, is to fold up a really thin sticky mat, if you have one. Shown here are the two sizes of dowel you can use.
Getting started
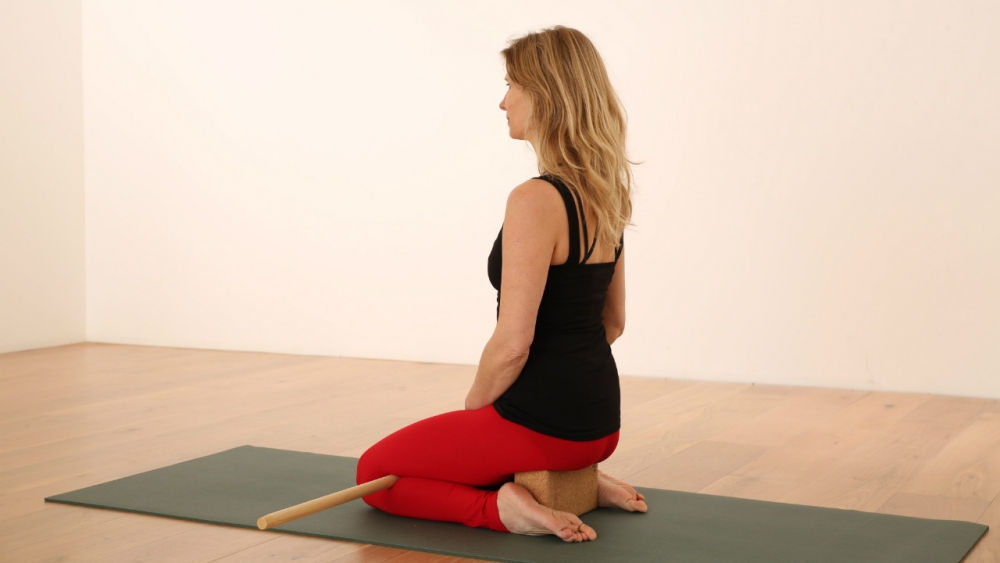
We will start off gently with holds of only one minute in each of the three positions. The first position uses all three cushions.
1. Position one
Place the dowel behind the back of the knees and sit with the cushion between your feet. Make sure the dowel is snug but not painful. The feet should point straight backward. If this bothers your ankles, place towels under them. Stay here for one minute and notice the sensations you experience.
As mentioned, this is a variation of Virasana. B.K.S. Iyengar claims that Virasana can create the proper arch in the feet due to stretching of the ankles and the feet. He recommends a daily practice of a few minutes for several months. He also notes that “those suffering from pain in the heels or growth of calcaneal spurs … will get relief and the spurs will eventually disappear.” [1]
2. Position two
This requires us to take two cushions away, leaving one to sit on, and roll the doweling back a couple of inches, so that it is on the calves. Then sit back down for another minute. This position can be very juicy: stay calm but if it becomes really painful, stop!
3. Position three
Position three is the same as position one: pull the dowel snug behind the knees again but sit on only two cushions. Stay here for a final minute.
Over time, work towards two minute holds in each position, and when you can tolerate this, try the thicker doweling. If 1.5 inch doweling doesn’t work, try 1.25 inch doweling first.
My experience
I suffered tears in both my medial menisci. No yoga practices cured the problem, so I eventually had arthroscopic surgery on both knees; however, the pain was never completely resolved.
The surgeries did allow me to regain normal function in my knees, but it was at a cost. My surgeon warned me that the operations would hasten the day when arthritis would occur in my knees. I am now 8 years post-op [at time of writing] and my knees are fine – thanks (I believe) to this daily practice.
I damaged my menisci because my ego was too strong and I believed in the adage, “no pain, no gain.” Since my operation, I’ve worked a lot to open my hips but with zero tolerance for any pain in the knees.
My knee issues arose because my hips were very tight when I first started practising yoga, but I ignored the warning signals – the burning pain in my knees whenever I did external rotations of the hips. I damaged my menisci because my ego was too strong and I believed in the adage, “no pain, no gain.”
Since my operation, I’ve worked a lot to open my hips but with zero tolerance for any pain in the knees. Over time my hips opened to the maximum that they will ever open. I know now not to push them any further. At some point, we all reach our limits and once we get there, we simply have to accept that that is that. Acceptance of the reality of our limits is very yin.This practice has helped to keep the space in my knee joints from collapsing, thus avoiding arthritis. Also, the fact that we stress the knee joint in a safe, non-painful way stimulates the various cells in the knees to grow more tissues. All tissues need stress to be healthy: the kneecaps, the cartilage and ligaments are no different. When we stress these tissues the fibroblasts, chondrocytes and osteoblasts are all stimulated to create more ligament, cartilage and bone, as well as to secrete the fluids that lubricate the joint.
If you are suffering from knee issues, why not give this practice a try for a few months and see how you get on? Remember though: no pain, no pain!
Bernie Clarke
Related:
Footnotes:
1. Light on Yoga by B.K.S. Iyengar, page 122
This article was previously published on YinYoga.com